I wanted a way to monitor our home’s water consumption as we’ve had a few running toilets that hadn’t been caught for too long. Since the meter is buried under the stairs in a storage area it’s annoying to get to to read regularly so I wanted an automated somewhat realtime method.
My meter is a Neptune T-10 meter that has a few ways to read. There is a large dial as well as a small higher resolution spinning triangle. These meters also have a magnet inside that rotates with the flow that is monitored by the water company.
The magnet seemed the most obvious method but unfortunately every hall effect sensor I tried could not read the magnet through the casing. The only place that appears you can easily do this is where the remote monitoring that the water utility uses is located. I couldn’t really mess with this, and after a brief thought of intercepting the water companies signals, I temporarily gave up on the magnet path.
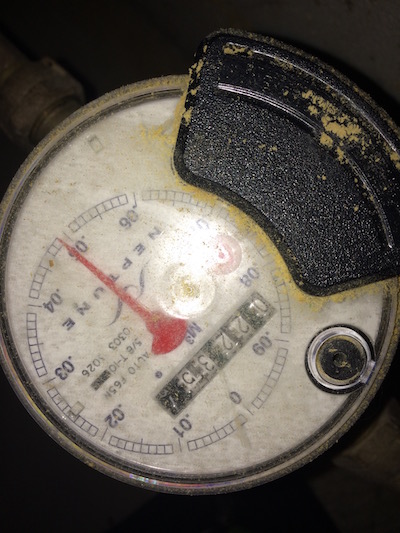
My next attempt was using a SY310 photo sensor. This sensor can detect dark to light color changes and I had opened to catch the tips of the red triangle as it rotated. Other people had success with this method on similar meters, but my meter cover was too scratched and reflected/scattered way too much IR for this to work properly. You can see in the photo above how textured the top is and how the flash scattere, this didn’t help. After an hour of trying to get it to read while stuffed under my stairs with a laptop I went back to the drawing board.
I started looking at different ways to detect the magnet again that were much more sensitive. I found a few magnetometers in compass break out boards that seemed to have very high sensitivity and seemed to fit the bill perfectly. I ordered a HMC5883L breakout from adafruit and after hooking it up to a spare Raspberry Pi I was able to notice a change in the readings when water was running. I had the most consistency when facing the breakout against the monitor so that the Y axis would catch the magnet approaching and then leaving. This meant that I was getting a nice positive to negative oscillation that I could count.
I found some code for an arduino that solved the same problem and ported this to Python to be used on my RPi. I also added uploads to both GroveStreams and ThingSpeak to make sure it was tracked and graphed (still deciding on the end provider so using both).
The end result so far looks like this:
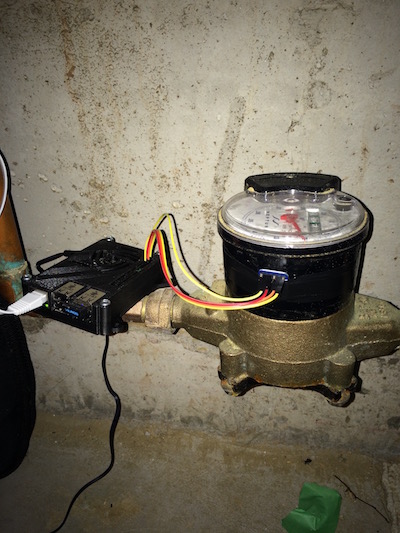
Obviously some longer wires and properly mounting the RPi is in order but it works well for now. Here is a live view from thingspeak.
You can find the code and wiring instructions for the HMC5883L in my github watermon repo.
Going forward I will probably replace the RPi with something like a Particle Photon or other Wifi microcontroller but for now the RPi works well. It was much easier to debug via SSH as well while writing the code than constantly programming under the stairs.