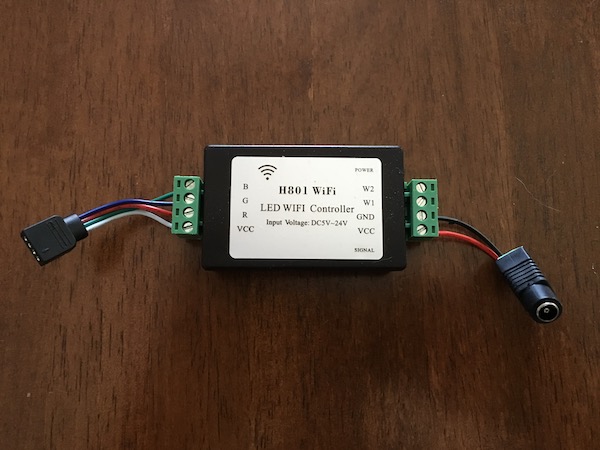
The H801 is a cheap LED Wifi controller for analog LED strips. It’s built in firmware is fairly useless using anything but their Android app but the best part is it uses an ESP8266 inside so it can be reflashed into something much more useful. I specifically converted mine to a firmware that speaks MQTT so that I can integrate easily into Home Assistant.
Opening the H801 is very easy, only 4 screws on the bottom. The board is hot glued to the bottom so it may take a bit of effort to pop it off. Watch the wires on the bottom when pulling the PCB out.
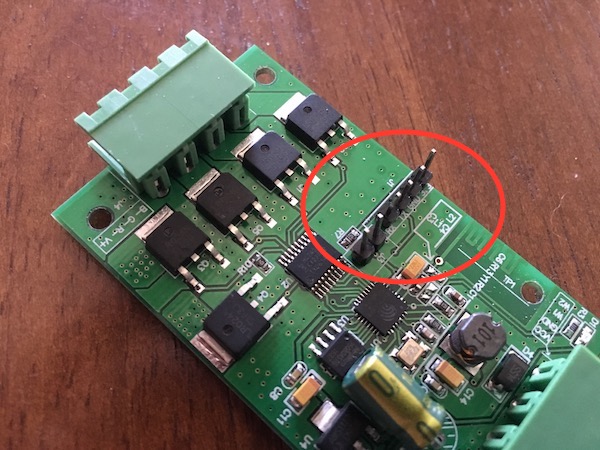
There are 6 pins that will need headers added to them. One in a group of 4 and another in a group of 2. Simply solder headers to these and then you can proceed.
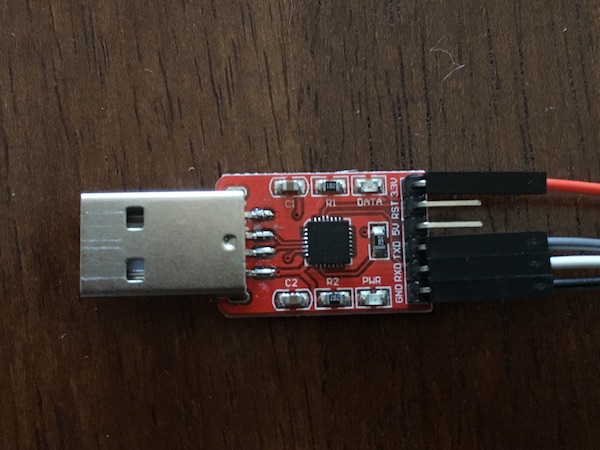
You will need a USB to UART/TTL/Serial adapter to reflash these as there is not one on board. I use a CP2102 based one here bought off of Aliexpress.
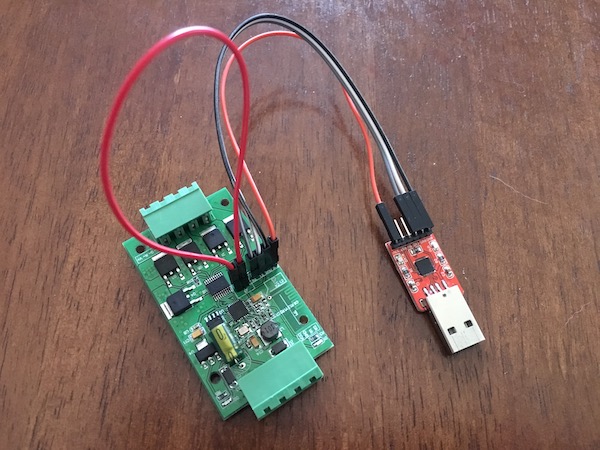
Simply hook the 3.3v, ground, transmit and receive wires up between the headers you just soldered on and the USB to UART/TTL/Serial adapter. You will need to use a jumper wire to connect the remaining two pins together on J3 to put the board into flash mode. Make sure you use the 3.3v for power NOT the 5v as the ESP8266 is not 5v tolerant here.
Download and install the Arduino IDE. Once installed Ensure that http://arduino.esp8266.com/stable/package_esp8266com_index.json is listed in the additional board manager URL field within the preferences. In the Boards Manager you will then be able to find the ESP8266 and install. You will also need to make sure that the following libraries are installed in the Library Manager:
- WifiManager
- PubSubClient
- ArduinoOTA
There is not a predefined board configuration for the H801 setup so you will need to set your board information as follows:
- Board: Generic ESP8266
- Flash Size: 1M (64K SPIFFS)
- Upload Speed: 115200
Make sure you have disconnected any other external power and LED strips from the H801 and then plug in the USB adapter. The USB adapter will power the H801 while we flash. You should see a new port show up in the Arduino software which can be chosen.
Open the mqtt.ino software previously mentioned above and edit the MQTT server details as needed. Next, flash the firmware to the ESP8266 which should take about 20 seconds or so.
Unplug the wiring and power the H801 via its VCC/ground pins instead of USB. You should see a new Wifi network appear for the ESP which you can connect to on a phone / laptop. Go to http://192.168.4.1 in a browser and setup your Wifi.
Once you are done this you should see the green LED on the H801 flash multiple times after it is rebooted which means it has successfully connected to the Wifi and MQTT server.
I found it easiest to connect this to power by connecting a cheap barrel jack with screw terminals via short lengths of wire to the terminals on the H801. I also sacrificed an LED extension cable with the common 4-pin plug for the LED connection terminals to make it easier to connect and disconnect.