The new headset that comes with the Xbox One is pretty terrible, and I’d much rather use the existing headset I already had. Unfortunately Microsoft decided to hardwire the headset into the adapter that plugs into their new proprietary port as well. To fix this, I swapped the headset piece on the adapter with a simple 2.5mm plug so I can use any headset I want.
First you will need to remove the bottom plastic case from the adapter. It just pulls off if you grab the edge where the top and bottom halves meet. Once inside you will need a T5 or a T6 (mine was T6, another was T5, go figure) Torx driver to remove the 5 screws here:
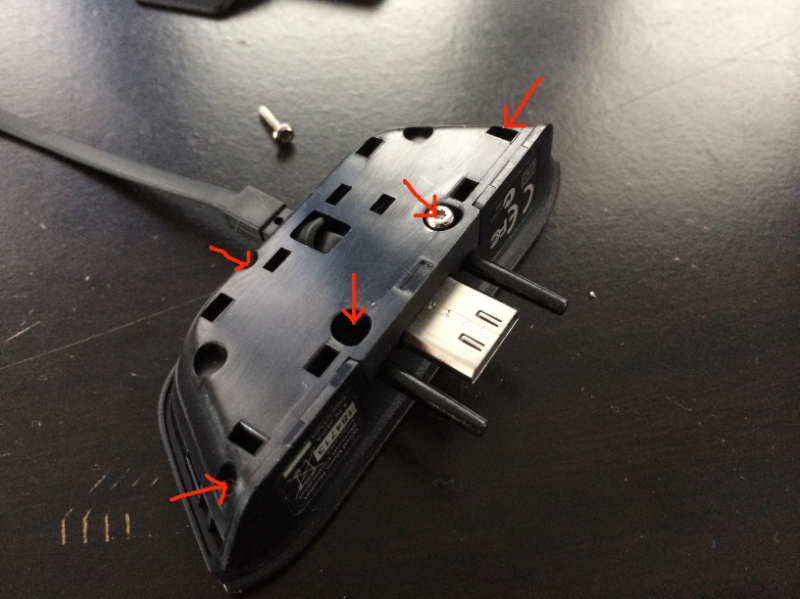
Once those are out you can separate the two halves and get to the PCB. Be careful of the wires as they are still attached to one half of the adapter via the strain relief. You will need to pull that out of its clip.
Desolder the 4 wires attaching the headset to the adapter carefully. You will then need to find an appropriate 2.5mm cable you can sacrifice. Strip the jacket off it and you should have three wires. Generally these are red, blue and a bare ground. If you have different colors, use a meter to figure out which is which as this depends on you having the standard colors. These are probably 30AWG wiring as well which horrible coatings so generally the quickest way to strip the coating off is a lighter to burn it off. Clean off the ends and tin them with solder to make attaching them easier.
With the proprietary jack facing to the left, top to bottom the wiring is:
- Blue
- Not Connected
- Red
- Ground (bare)
See the (blurry, sorry) photo below for reference:

I used some hot glue to hold things down properly since the strain relief was no longer in place and then snapped it all back together.
The mute and volume controls will continue to function but you can now use your own headset.
WordPress and its plugins require updates pretty frequently and since I maintain several sites doing this update has become a bit tedious by hand. I really don’t like having FTP access into my web sites unless absolutely necessary which seems to be the only way to do things within the application itself.
To combat this, I wrote a simple script that when passed a path to a wordpress install will update wordpress to the latest version and all currently installed plugins (activated or not). This will forcibly upgrade things even if they are already up to date, so be careful with any customizations you may have made to plugins. It does not currently update themes for this reason.
I had several issues with NFS speeds on my FreeNAS server. It’s only 3 fairly slow SATA disks with an SSD ZIL drive but it wasn’t really living up to its potential via NFS.
I finally stumbled across some of the issues with the caching issues with NFS and that we basically need to get ZFS to stop dumping cache on every write sync NFS requests. Turns out there is a FreeBSD kernel parameter to fix this:
vfs.zfs.cache_flush_disable=1
You can set this as a tunable in FreeNAS as you can’t really add your own kernel parameters any other way properly. I saw approximately 5-8x improvements in write speeds via NFS depending on the work load. Not too shabby.
NOTE: This can cause serious corruption problems if you lose power unexpectedly so ensure you understand the risks associated with the performance boost.
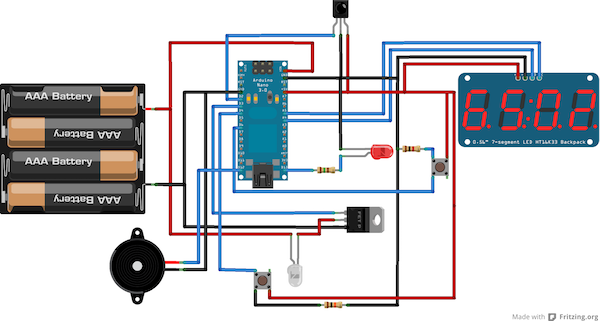
I had been looking for an Arduino-based project for a while as an excuse to buy one. My son played laser tag at a local field and I figured “Hey, I can build that”. A few Arduino Nano’s later and an order from Adafruit I was prototyping.
Diagram of the layout:
Arduino sketch is available at github.
Components per gun:
- Arduino Nano
- IR receiver
- 5mm IR LED
- 5mm red LED
- MOSFET
- Piezo buzzer
- 4 x AA battery holder
- 7-segment LED display with I2C backpack
- 6mm tactile switch x 2
For a case I chose a Buzz Bee Cougar foam dart gun. I chose this as not only was it only $10 but it had plenty of room in the center body for equipment I had to stuff in it. It’s actually a pretty decent foam dart gun on it’s own, comfortable and the cocking mechanism is in the stock which I was able to retain for reloading purposes.
The barrel and lens were a lucky buy in a set of $5 binoculars that perfectly fit in the barrel location of the Cougar. The lens isn’t perfect for the focal length in terms of range, but it’s more than adequate for now and testing.
First build test:
Now to build a second one.
I had been excited to pick up a replacement for my Asus RT-N56U for some time as I was having some stability issues. It was still a lot better than the Actiontec provided by Bell Aliant, but I wanted something a bit more configurable anyway. The EdgeMax Lite seemed promising and I pre-ordered one quite a while ago. It’s essentially a fork of Vyatta but in a nice little package.
FibreOp requires a bit more configuration than the average connection as well especially with the IPTV component. The Internet piece runs in VLAN 35 which is where you will get your DHCP address from. They seem to have removed the requirement of cloning the MAC of the Actiontec so this has become slightly simpler. The IPTV piece runs on VLAN 34 but requires that the vlan-qos be set to 4, or all traffic is dropped. This was my config:
interfaces {
    bridge br0 {
        aging 300
        description "IPTV Bridge"
        hello-time 2
        max-age 20
        priority 0
        stp false
    }
    ethernet eth0 {
        address 192.168.2.1/24
        description "Local Network"
    }
    ethernet eth1 {
        bridge-group {
            bridge br0
        }
        description "IPTV Receivers"
    }
    ethernet eth2 {
        description Fiberop
        vif 34 {
            bridge-group {
                bridge br0
            }
            description "FibreOP IPTV"
            mtu 1500
        }
        vif 35 {
            address dhcp
            description "FiberOP Internet"
            firewall {
                in {
                    name WAN_IN
                }
                local {
                    name WAN_LOCAL
                }
            }
        }
    }
    loopback lo {
    }
}
This worked fine for me on the Internet side, but IPTV was still not working as I was not using the QoS properly. I couldn’t find a way to do this in the CLI at all. However, since this is Linux (Debian) I can use vconfig to perform this task. Unfortunately it appears that UBNT decided not to include this package in their distro. Grab the .deb file for the vpn mips package from Debian and stick it in /config/user-data. I’m putting this here as /config should survive through software updates.
The important commands are to modprobe 8021q and then perform the vconfig commands, but we want this to happen on a reboot automatically. Create a script /config/scripts/post-config.d/setup_8021q.sh and put the following in it:
#!/bin/bash

if [ ! -f /sbin/vconfig ]
then
    /usr/bin/dpkg -i /config/user-data/vlan_1.9-3_mips.deb
fi

# Sets the proper CoS for the IPTV
modprobe 8021q
/sbin/vconfig set_egress_map eth2.34 0 4
What this script will do is ensure not only that the proper VLAN QoS will be applied on a reboot, but it also will install the vlan package if vconfig is missing (such as after a reboot).
You will want to apply a firewall, NAT, etc as well to the config but this will solve the biggest problems of using a EdgeMax with Fibreop.
I use an ASUS C60M1-I for my FreeNAS install which works great. The only problem was I had no easy way to monitor the CPU temperature which is a bit concerning since this is a fan-less motherboard. I came across the mbmon package though which does everything needed. Here is the quick way to install it on FreeNAS 8 on a USB Drive:
mount -uw / && pkg_add -r mbmon
After that log out and back in and you should be able to temperature and voltage info by executing the mbmon command.